

Upgrade Your Rifle With A Timney Trigger
Posted by J. Scott Rupp on Jan 10th 2018

Originally Published by RifleShooter, Jan 8, 2017: http://www.rifleshootermag.com/gear-accessories/upgrade-your-rifle-with-a-timney-trigger/#ixzz53p7eTZPJ
I have this project gun, a Model 700 Mountain Rifle in .280 Rem. Over its 20-year existence, it’s been restocked, rebarreled, bedded, re-bedded and re-bedded again. I never got around to replacing the trigger, though. Early on I had a gunsmith smooth out the factory job and get the weight down to three pounds. He did nice work, but there was always a tiny bit of creep in it. It didn’t bother me that much because it came at the same spot and was predictable, but eventually I decided it was time to upgrade.
For that I turned to Timney Triggers. The company enjoys a solid reputation, and the Timneys I’ve tried I’ve liked. Also, I’d previously installed one of its triggers on a Ruger Model 77, so I was pretty sure I could do it.
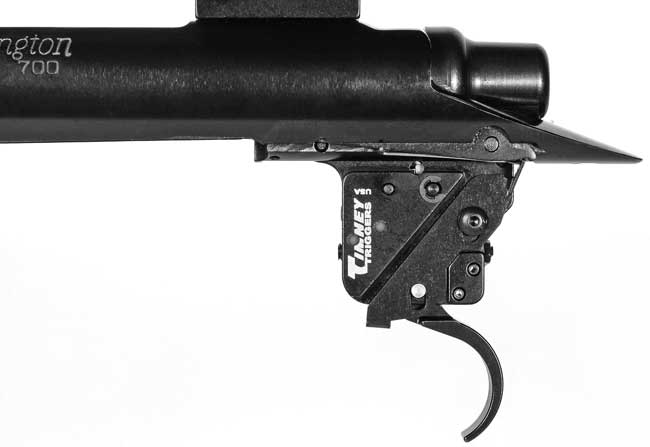
The M700 BDL trigger I installed doesn’t offer just an improved pull. It’s actually a new design, with a safety that blocks the trigger instead of the sear. The trigger cannot move with the rifle on Safe, and when it’s placed on Fire, the trigger remains in the exact same position.
Timney’s 700 replacement trigger is also made from a solid piece of heat-treated steel. Old factory 700 triggers like mine have a connector bar at the top, a piece that has been blamed for some of the trigger’s issues. I’d never removed an older 700 trigger before, so I learned about the connector firsthand when it popped out of the unit when I’d driven out the pins. But no matter; it’s not something you need going forward.
The Timney trigger is a true drop-in. There’s no drilling, no tapping, and if a ham-fisted tool-wielder like myself can do it in just a matter of minutes, anybody can.
The instructions are nicely done and easy to follow, but if you want to get a sense of how simple the process is, here’s the gist. Unload the rifle and remove the barreled action from the stock. Remove the bolt and place the safety in the Safe position. Doing so exposes the rear trigger pin.
There are two pins that hold the trigger in place. Drive the front one left to right just far enough to free the front of the trigger. You want to be a little more careful on the rear pin because it also keeps the bolt release and its spring in place. Tap the rear pin out right to left but not so far that the bolt stop and spring are released. I used a 3/32 pin punch and an old Brownells nylon/brass hammer. (As an aside, if you don’t own one of these hammers or one like it, get one. They’re super- handy.)
Remove the old trigger, drop in the new one. When you drive the front pin back in, go easy. You don’t want the pin interfering with the bolt stop. As soon as you see it’s flush or nearly so with the receiver, stop right there.
The directions indicate you may have to bend the trigger’s bolt release slightly with a needle-nose pliers in order for it to fit the notch in the bolt stop precisely, but mine fit perfectly without any adjustment.
Timney also indicates the trigger’s finger lever is larger than the factory one and may require you to hog out a bit of the stock where the finger lever passes through. But in my case the finger levers were the same size, and I didn’t have to do anything.
In addition to the standard curved trigger, this particular model is available in straight and thin configurations. Other options include a left-hand version and one that’s nickel-plated. In addition, you can have Timney set it at the weight you desire.
The result? Wow. The Timney breaks like proverbial glass. As it came from Timney it averaged two pounds, six ounces—a bit lighter than what I’d specified—and I was really tempted to leave it where it was because it felt so good. But since it’s adjustable from 1.4 to four pounds, I just had to mess with it.
Using a small Allen bit (not included), all you have to do to adjust the trigger is turn a single screw: turn in to increase weight, back it out to reduce weight. I bumped mine up to 2.75 pounds, which I find is a really nice hunting pull weight—splitting the difference between the serviceable but perhaps a touch heavy three pounds and the “hmm, maybe too light for cold fingers and/or gloves” 2.5 pounds. (Look, when you’re a trigger geek you can split as many hairs as you like.) Pull variance was only a couple of ounces over 10 pulls.
The project was a success all the way around. I replaced a decent trigger with a far better one, did it myself—easily—and I couldn’t be happier with the result.
The trigger costs $145, and it’s compatible with nearly 40 Model 700 variants, including Model 700 forerunners 721, 722 and 725.